
Views: 0 Author: Site Editor Publish Time: 2025-08-08 Origin: Site
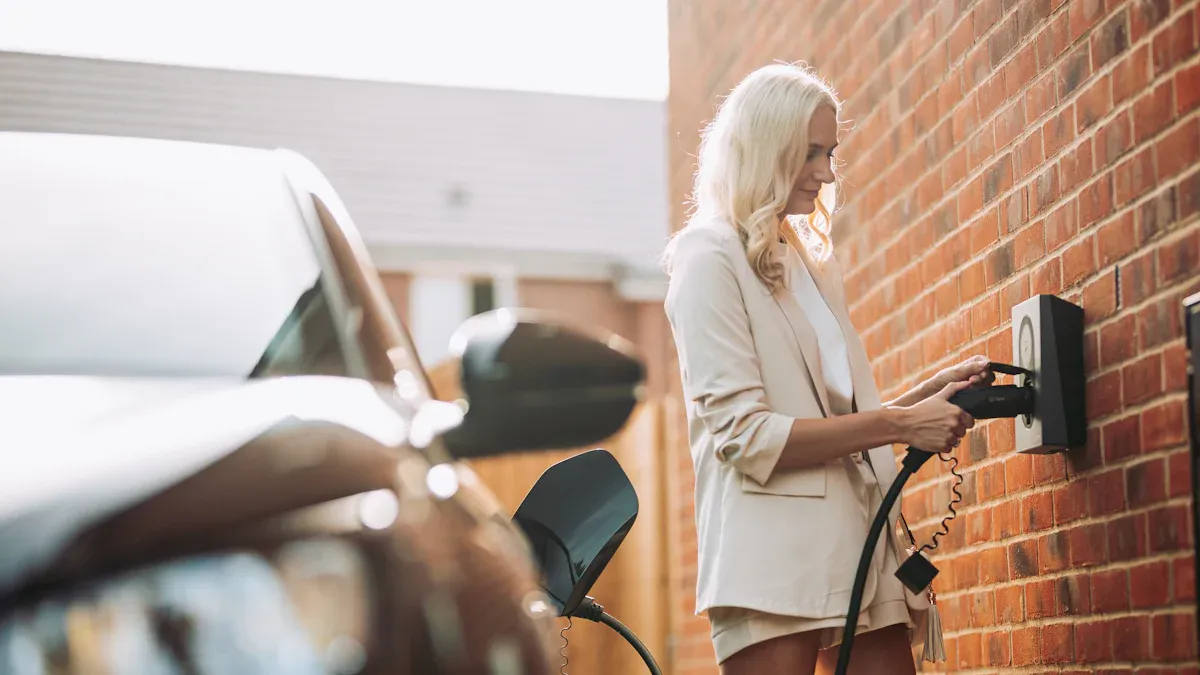
Installing an ev charger outlet at home is a great way to conveniently charge your electric car, but safety should always come first. Many homeowners choose a 240 volt ev charger outlet to speed up charging times. Using the right ev charger outlet helps reduce risks such as overheating, ground faults, or power surges. Proper grounding and certified equipment protect your charging cables and plugs from damage. Make sure to install your 240 volt ev charger outlet close to your parking spot for easy access. Regular inspections and following safety guidelines will keep your home ev charger outlet setup safe and ensure your electric car is well protected.
Use a special 240-volt outlet with good grounding. This helps charge your electric car safely and faster.
Look at your home's electrical panel to check its capacity. Get the right permits before you put in a 240-volt outlet.
Pick a safe and dry spot close to where you park. This makes charging easy and keeps it secure.
If you are not sure, hire a licensed electrician. A professional will make sure the job is safe and follows the rules.
Check your EV charger outlet often and follow safety rules. This keeps your home and electric car safe.
An ev charger outlet is a special type of electrical outlet made for charging your electric car. Unlike standard outlets in your home, these outlets often use 240 volts. This higher voltage lets you charge your electric car much faster. You need a dedicated circuit for an ev charger outlet, which means it has its own wiring and breaker. This setup helps prevent overheating and keeps your charging safe. The outlet is larger than a regular one and has a different prong shape. You should always turn off the circuit breaker before plugging in or unplugging your charging station. These outlets also have extra safety and grounding features to protect your electric car and home.
| Outlet Type | Voltage | Amperage | Typical Use/Description | Charging Level | Charging Speed (Miles of Range per Hour) |
|---|---|---|---|---|---|
| Standard Household | 120V | 15A | Common household outlet (NEMA 5-15), used for most devices | Level 1 | ~4 miles/hour |
| EV Charger Outlets | 240V | 30-50A | Specialized outlets (NEMA 14-30, 14-50, 6-50) for EVs | Level 2 | 20-35 miles/hour |
You can charge your electric car using two main types of charging. Level 1 charging uses a regular 120V outlet. This method adds about 3-5 miles of range per hour. It works well if you drive short distances each day. You do not need special installation for Level 1 charging. Level 2 charging uses a 240V outlet, like an ev charger outlet. This method charges your electric car much faster, adding 20-60 miles of range per hour. You can fully charge your car in 4-8 hours with a level 2 charger. Level 2 charging is best for people who drive often or need quick charging at home ev charging.
Tip: Level 2 charging is a smart choice if you want to save time and keep your electric car ready for daily use.
You will find several outlet types for charging your electric car at home. The SAE J1772 (Type 1) connector is the most common for non-Tesla vehicles. It works with both Level 1 and Level 2 charging. Tesla cars use the Tesla NACS connector, which is also becoming more popular for other brands. Most homes use single-phase power, which matches these connectors. When you set up your charging station, make sure you choose the right outlet for your electric car and charging needs.
When you put in a 240 volt outlet for your electric car, you need to check if your home's electrical system can handle more power. A 240 volt outlet uses much more electricity than a regular outlet. You should look at your main electrical panel first. Most homes need a 200 amp service to add a 240 volt outlet safely. Always use a special dual-pole 240 volt circuit for your level 2 charger. This means the outlet gets its own breaker and wires. This setup helps stop overheating and keeps charging safe.
Circuit breakers for 240 volt outlets must be rated higher than the charger's load. For example, if your charger uses 40 amps, you need a 50 amp breaker.
Most home chargers need a 40 or 50 amp breaker. Some powerful chargers may need up to 80 amps.
The wire size must match the breaker size. Thicker wires are needed for more amps to stop overheating.
Never use a dryer or range outlet for charging your electric car. These outlets are not made for long, heavy use.
Tip: Always make sure your electrical panel has enough space and power before you put in a new 240 volt outlet.
Safety is the most important part when you install a 240 volt outlet for charging. Grounding protects you and your home from shocks and fires. Modern 240 volt outlets, like NEMA 14-30, NEMA 14-50, and NEMA 6-50, have a separate grounding wire. This wire sends electricity safely to the ground if something goes wrong. Proper grounding is required by electrical codes and helps keep your charging setup safe.
Grounding methods include:
Using a special grounding wire in the outlet wiring.
Connecting the outlet to the main electrical panel.
Installing GFCI breakers that shut off power if there is a problem.
Hardwiring the charger straight to the panel for extra safety.
| Safety Aspect | Common Code Requirement / Violation Risk |
|---|---|
| Panel Capacity | Must support the charger's amperage (usually 32-50A); not enough capacity breaks the rules. |
| Breaker Space | Needs a special double-pole breaker; no dedicated breaker breaks the rules. |
| Wiring Path | Should be short and safe; bad wiring can cause problems. |
| Grounding | Good grounding is needed to stop shock risks; bad grounding breaks the rules. |
| Permits & Inspection | Permits and inspections are often needed; not getting them breaks the rules. |
Note: Always get the right permits and have your work checked to avoid breaking safety rules.
Picking the best spot for your 240 volt outlet makes charging your electric car easier and safer. Most people put the outlet on the garage wall closest to where they park. This keeps the charging cable off the ground and stops people from tripping. You should also think about where your car’s charging port is. Putting the outlet near the port means you do not have to stretch the cable.
Put the 240 volt outlet inside, like in your garage, to protect it from weather and damage.
Keep the outlet away from water and things that can catch fire. It is best to mount it three to four feet above the ground in a dry spot.
Use a cable that is long enough (15-25 feet) to reach your car easily, but not so long that it gets messy.
If you have more than one electric car, put the outlet or charger in the middle between parking spots.
Make sure your garage has enough room for parking and charging every day. Organize your stuff to keep the area clear.
Reminder: Picking a good spot for your 240 volt outlet will make charging safer, faster, and easier.
Get your workspace ready before you start. You also need the right paperwork. Most towns want you to get an electrical permit first. This permit checks if your work follows the National Electrical Code and local rules. You need a permit if you add a new circuit or hardwire your charger. If you use an old 240 volt outlet, you might not need a permit, but this does not happen often. Always ask your local building department to be sure.
When you apply for a permit, here is what happens:
You have to give site plans, wiring diagrams, and load calculations.
The permit process checks if your home can handle more power.
If you hire a pro, you must show their license info.
Permit fees are usually between $50 and $300.
After you finish, an inspector will come to check your work.
Tip: A licensed electrician can help with permits and make sure your setup is safe and legal.
You need the right tools and materials to do the job. Good, weather-resistant outlets keep your charging safe and working well. Copper wiring is best because it carries high current safely.
| Category | Items Needed |
|---|---|
| Tools | Voltage tester, Drill, Screwdrivers, Wire strippers, Measuring tape |
| Materials | 240 volt outlet, Electrical conduit, Double-pole circuit breaker, Copper wire, Mounting hardware |
You also need a wire connector kit, electrical tape, and an electrical box. Use the right wire size for your charger's amps. For example, use 8 AWG wire for 32-40 amps and 6 AWG for 48 amps. Always use a double-pole breaker that matches your charger.
Here are the average costs for tools and materials:
| Material/Tool | Average Cost (USD) |
|---|---|
| 50-amp 240-volt outlet | 9 |
| 50-amp 240-volt locking outlet | 27 |
| 20-amp 240-volt round outlet | 35 |
| 50-amp 240-volt outdoor boxed outlet | 27 |
| 120/240V circuit breaker | 45 |
| 50 feet of 300-volt electrical wire | 40 |
| Replacement 3 or 4-prong cable cord | 30 |
| Voltage tester | 19 |
| Wire connector kit | 12 |
| Electrical tape | 3 |
| Electrical box | 7 |
| Screwdriver | 6 |
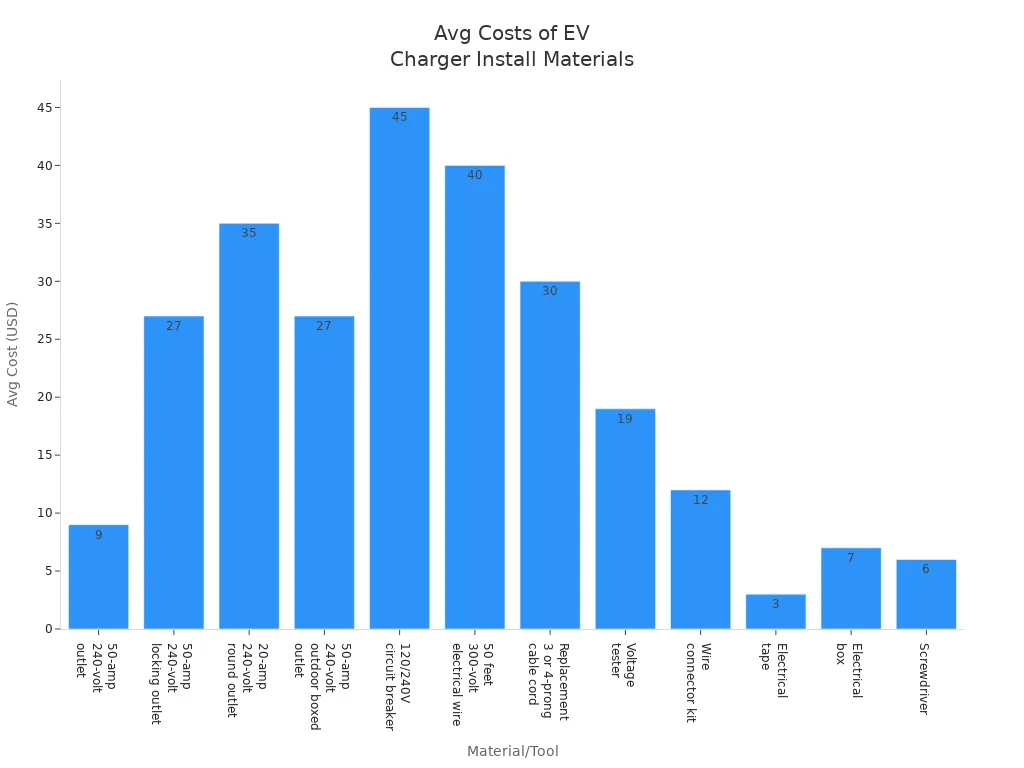
Note: Paying a professional electrician is often the biggest cost.
Follow these steps to install a 240 volt outlet safely. Always turn off the main power before you begin. If you are not sure what to do, call a licensed electrician.
Turn off the main power at your electrical panel.
Plan the wiring path from the panel to the outlet spot.
Put in a double-pole circuit breaker that matches your charger's amps, usually 40 or 50 amps.
Run the right size copper wire through conduit from the panel to the outlet.
Connect the wires to the 240 volt outlet. Use black and red for hot, white for neutral, and green or bare for ground.
Put the outlet in a junction box and mount it on the wall. Place it at least 18 inches above the floor inside, or 24 inches above the ground outside.
Check all connections again. Make sure the outlet is grounded right.
Turn the power back on and use a voltage tester to check the outlet. Make sure it gives the right voltage.
Safety Alert: Never use aluminum wire for charging. Copper wire is safer and works better with high current.
Avoid these common mistakes:
Using a panel that cannot handle enough amps.
Not leaving space in the panel for a new breaker.
Skipping the permit step.
Using the wrong wire or outlet.
Forgetting to add permit costs to your budget.
Tip: If your panel is full or needs an upgrade, always call a licensed electrician.
After you finish, you must test the outlet and get an inspection. Testing makes sure your outlet is safe to use.
Do these steps:
Look at the outlet and wires for loose parts or damage.
Use a voltage tester or multimeter to check the voltage.
Plug in your EV charger and look for error messages or faults.
Make sure the brass clamps inside the hot slots are tight.
If you use a standard outlet, check it every few years for wear.
Local inspectors will check your work. Here is what they look for:
| Inspection Requirement | Description |
|---|---|
| Building Permit | Needed before you start to follow local rules. |
| Dedicated Circuit | EV charger outlets must have their own circuit. |
| Overcurrent Protection | Circuit must be rated at 125% of the charger's max load. |
| GFCI Protection | Outlets up to 50 amps need Ground Fault Circuit Interrupter protection. |
| Weatherproof Enclosures | Outdoor outlets must be in weatherproof boxes. |
| Placement and Cord Length | Charging cords can be up to 25 feet long. |
| Installation Height | Indoor outlets at least 18 inches above floor; outdoor at least 24 inches above ground. |
Inspectors also check your permit, wiring, grounding, and breaker size. They make sure your 240 volt outlet is safe and follows all codes. If you pass, you can charge your electric car with no worries.
Reminder: If you are not sure about any step, always use a licensed electrician. Safety and following the rules protect your home and car.
When you pick how to put in your EV charger outlet, cost matters a lot. Doing it yourself can look cheaper at first. You only pay for things like wires and outlets. These can cost between $50 and $200. If you already have tools, you might spend less than $200 total. But there are extra costs you might not see right away. If your electrical panel needs an upgrade, the price can go up fast. It could cost $1,000 or even $2,500. You also need to pay for permits and inspections. These can add $100 to $400 more. If you make mistakes, fixing them can be expensive. It can also be unsafe.
Getting a pro to do the job costs more at the start. Most people pay between $400 and $1,800 for a licensed electrician. This price covers their work, permits, and all the parts. If your house needs a new panel, it can cost $4,000 or more. The table below shows a quick look at the costs:
| Installation Type | Cost Range (USD) | What’s Included |
|---|---|---|
| DIY Installation | $0 - $200 | Materials, your own labor |
| Professional Installation | $400 - $1,800+ | Labor, permits, materials, expert assessment |
| Panel Upgrade (if needed) | $1,000 - $4,000+ | New panel, extra wiring, professional labor |
Tip: Hiring a pro may cost more, but it helps you avoid surprise costs and keeps your home safe.
Think about the good and bad sides before you pick DIY or pro installation. Safety, time, and value are all important.
DIY Installation:
Costs less at first
You can work on your own schedule
Risk of shock or fire is higher
Might cancel your EV charger warranty
Could break rules and get fined
Need special tools and know-how
Professional Installation:
Costs more at first
Gets done fast and right
Makes sure everything is safe and follows the rules
Keeps your warranty safe
Gives advice on where to put the outlet
Insurance pays if something goes wrong
| Aspect | DIY Installation Risks | Professional Installation Benefits |
|---|---|---|
| Safety | High risk of shock or fire | Trained experts prevent hazards |
| Warranty | May void warranty | Maintains warranty protection |
| Compliance | May not meet local codes | Handles permits and inspections |
| Tools | Need to buy or rent special tools | Electrician brings all needed equipment |
| Time | Can take much longer | Usually completed quickly |
Note: Putting in a 240 volt outlet is not like setting up a simple appliance. You work with strong electricity, which is dangerous if you do not know what you are doing.
You can make a 240 volt outlet safe for your EV charger by following some important steps.
Always get certified electricians to do the work and use equipment that has been tested.
Get the right permits and follow local rules so you do not get fined or fail an inspection.
Keep your 240 volt outlet far from water and things that can catch fire.
Have regular checks and maintenance to stop problems before they start.
Pick a safe, bright spot for your 240 volt outlet and make sure kids cannot reach it.
| Risk Category | Legal Consequence |
|---|---|
| No Permit | Fines, removal |
| Code Violation | Failed inspection |
Always put safety first when you install your 240 volt outlet. Getting help from a pro and planning well keeps your home and car safe.
You can install an EV charger outlet if you have electrical experience. Always follow safety rules and local codes. If you feel unsure, hire a licensed electrician. A step-by-step installation guide helps you understand the process and avoid mistakes.
You need a 240-volt outlet, such as NEMA 14-50, NEMA 14-30, or NEMA 6-50, for Level 2 charging. These outlets provide faster charging and meet most electric vehicle needs.
Most cities require a permit for new 240-volt outlets. Permits make sure your installation meets safety codes. Always check with your local building department before starting any work.
Charging time depends on your charger and car. Level 1 charging adds about 4 miles per hour. Level 2 charging adds 20 to 35 miles per hour. Most people charge overnight.
Install your outlet close to your parking spot, usually on a garage wall. Keep it away from water and flammable items. Make sure the area is dry, safe, and easy to reach.


