
Views: 0 Author: Site Editor Publish Time: 2025-08-21 Origin: Site
Installing an EV charger at home makes charging your electric vehicle incredibly convenient. Simply plug in your car at night, and you’ll wake up each morning with a full battery. Most EV owners prefer installing an EV charger at home—76% charge at home, while only 45% use public charging stations:
| Charging Location | Percentage of EV Owners |
|---|---|
| Home | 76% |
| Public Charging Stations | 45% |
Before installing an EV charger, you may have some questions. You might wonder about the best location for the charger, what equipment is required, and whether your home’s electrical system is ready for the upgrade. Installing an EV charger at home is a great way to support the environment, especially if you use renewable energy sources. With a home charger, daily charging becomes easy, reliable, and safe.
Pick the right charger type. Level 1 chargers use normal outlets and charge slowly. Level 2 chargers need special wiring and charge much faster.
Get a licensed electrician to install your charger safely. They will follow local rules and get permits and inspections.
Look at your home’s electrical panel to see if it can handle the charger. You may need upgrades before you install it.
Use smart chargers to save money by charging at off-peak times. You can also watch your energy use easily.
Take care of your charger by checking cables and keeping it clean. Use weatherproof equipment if your charger is outside.
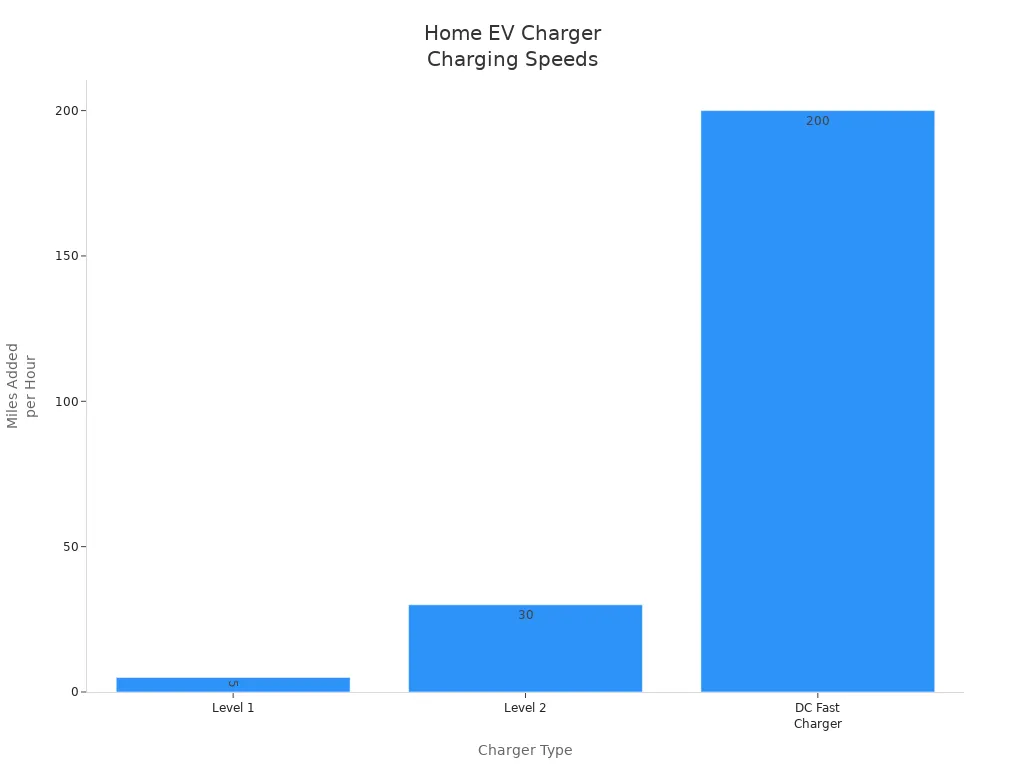
When you shop for a home charging station, you will see different types. The most popular are Level 1 and Level 2 chargers. Level 1 chargers plug into a regular 120-volt outlet. They are good for plug-in hybrids or charging overnight. Level 2 chargers use a 240-volt circuit and charge your car much faster. Many people pick a Level 2 charging station for daily use because it adds more miles each hour.
Here is a table that shows the main types of home EV chargers:
| Charger Type | Voltage Requirement | Power Output (kW) | Approximate Range Added per Hour | Ideal Use Case | Installation Considerations |
|---|---|---|---|---|---|
| Level 1 | 120 V | 1.2 - 1.8 | 4 - 5 miles | Plug-in hybrids, overnight charging | No special installation needed |
| Level 2 | 240 V | 7.2 - 11.5 | 20 - 30 miles | Fully electric vehicles, standard home charging | Requires electrical panel upgrade and dedicated circuit |
| DC Fast | High voltage DC | 25 kW to 150 kW+ | 45 - 200 miles (in 30 minutes) | Long trips, rapid charging | Not suitable for home use |
You can compare how fast each charger works in this chart:
If you want the best Level 2 charger, make sure it fits your car and your home’s power system.
Smart features make charging at home easier and better. Many Level 2 chargers connect to Wi-Fi and let you use your phone to control charging. You can set charging times to save money on electricity. Some smart chargers work with solar panels to help you use clean energy and lower costs.
Tip: Smart chargers let you watch your energy use, set charging times, and keep your battery healthy.
Smart home chargers also give you updates and safety alerts right away. You can check charging progress and change settings anytime. These features make charging your electric car at home easy and safe.
You need to make sure your home charging station matches your car’s connector. Most home chargers use either the J1772 plug or the NACS plug for Tesla cars. Many brands like BMW, Ford, Nissan, and Hyundai use J1772 connectors. Tesla cars use NACS, but you can use adapters to connect other chargers.
| Charger Level | Connector Type | Compatible EV Models / Brands | Key Features |
|---|---|---|---|
| Level 1 | J1772 | BMW, Ford, Honda, Hyundai, Kia, Nissan, Porsche, Chevy | Uses standard 120V outlet, provides ~1.44 kW power, 30-40 miles range overnight |
| Level 1 | NACS (Tesla) | Tesla Models S/3/X/Y, Cybertruck | Designed for Tesla, same power and range as J1772 Level 1 charger |
| Level 2 | J1772 | BMW, Ford, Nissan, and other J1772 EVs | 240V operation, 9.6 kW power, up to 36 miles range per hour charging |
| Level 2 | NACS (Tesla) | All Tesla models including Cybertruck | 240V, 9.6 kW power, optimized for Tesla vehicles |
Adapters help you use almost any charging station with your car at home. Always check your car’s manual before you install a home EV charger.
Before you put in an EV charger, check your home’s power. Most Level 2 chargers need a 240-volt line just for them. Your charger might use a J1772 plug for most cars or a NACS plug for Tesla. Most American homes have single-phase power, which works for Level 2 charging.
Here are the main things you need for EV charger equipment:
Level 2 chargers use single-phase 180-264 VAC.
Each charger needs its own circuit. No other device can use it.
The breaker must be at least 25% bigger than the charger’s amps. For example, a 32-amp charger needs a 40-amp breaker.
The wire size depends on the charger’s amps. Use 8-gauge wire for 40A chargers. Use 6-gauge wire for hardwired 48A chargers.
GFCI protection is needed for outlets rated 50 amps or less.
If you put the charger outside, use a weatherproof box. Mount it at least 24 inches above the ground.
Charging cords can only be 25 feet long unless you have a cable system.
Check if your electrical panel can handle more power before you install. Older homes often have 100-amp panels. Newer homes usually have 200-amp panels. If your panel is too small or full, you may need to upgrade or add a sub-panel.
| Charger Type | Voltage | Typical Breaker Size | Upgrade Need |
|---|---|---|---|
| Level 1 | 120 V | Standard outlet | Usually no panel upgrade needed |
| Level 2 | 240 V | 40-60 amp breaker | Often requires panel upgrade if capacity is insufficient |
You can use circuit-sharing devices or smart energy systems instead of a full upgrade. These help share power between your EV charger and other things in your house.
Tip: Always hire a certified electrician to put in your EV charger. This keeps you safe and follows local rules.
You must follow local rules and get permits before you put in EV charger equipment. Permits make sure your setup is safe and meets city rules. The steps are usually:
Get a building permit from your city’s planning office. Show plans with the charger’s spot and any changes to wiring.
Give proof of insurance for the electrician who will do the work.
Pay the fees for the permit. The cost depends on where you live.
Hire an electrician who knows how to install EV chargers.
Set up inspections as your city requires. Inspectors will check your work before you use the charger.
You also need to follow local electrical codes, zoning laws, and HOA rules. Some places want you to send in load calculations and wiring plans with your permit. If you live in California, you must follow the California Electrical Code and NEC Article 625.
| Requirement Category | Details |
|---|---|
| Plans | Must show you follow electrical codes; include a map with charger spot and panel sizes. |
| Electrical Plan | Single line diagram showing main panel size, dedicated circuit, wiring, grounding, and disconnects. |
| Load Calculations | Overcurrent protection sized for long use; lockable disconnects if needed. |
| Electrical Service Upgrade | At least 200 amps for single-family homes or 125 amps for duplex/ADU unless you use a load management system. |
Note: If you skip permits, you could get fined, have safety problems, or trouble selling your house.
You might think about putting in an EV charger yourself. Doing it yourself can save money, but it is risky. High-voltage power can shock you, start fires, or even kill you if you make a mistake. Bad installation can break rules, void your insurance, or hurt your charger or car.
Here are the main differences between professional and DIY installation:
DIY Installation Risks:
You could get shocked or start a fire.
You might break codes and get fined.
You could lose your homeowners insurance and EV warranty.
You may need repairs or to redo the work.
Professional Installation Benefits:
Licensed electricians make sure it is safe and follows rules.
The job is faster and done right.
Your warranty and insurance stay valid.
You are more likely to pass inspection the first time.
You know your charger will work well.
Only try DIY if you are a licensed electrician and the job is simple, like plugging in a Level 1 charger. For most people, hiring a pro is safer and better.
Follow these steps to install your charger at home:
Hire an electrician to check your home’s power and do upgrades.
Make sure your charger has its own circuit and is hardwired for safety.
Choose if you want the charger inside or outside. Inside keeps it safe from weather.
If you put it outside, check the charger’s rating and use waterproof parts.
Upgrade to a 240-volt system for steady charging.
Call your local office to ask about permits.
Get all papers ready, like site plans and load calculations.
Wait for your permit before you start.
Set up inspections as needed.
After you pass inspection, connect your charger and start charging your EV.
Callout: Weather can change how well your charger works. Cold slows charging and can hurt cables. Hot weather can cause overheating. Put your charger in a safe spot and use weather-rated gear for best results.
When you plan to install an EV charger at home, you need to think about both equipment and labor costs. Most Level 2 chargers cost between $299 and $799, depending on the brand and features. Installation costs can range from $800 to $2,500. The total price depends on how complex the job is. If your home already has a 240-volt outlet, you might pay less for installation. Permit fees can add another $50 to $800. Labor rates, the type of charger, and the location of your charger all affect the final cost. Here is a table to help you see what factors can change the price:
| Factor | Description & Impact on Cost |
|---|---|
| Charging Station Type | Level 1, Level 2, or DC Fast Charging; higher levels cost more to install. |
| Electrical Infrastructure | Upgrades to panels, wiring, and permits can increase costs. |
| Location | Local codes, permit fees, and labor rates vary by region. |
| Site Conditions | Distance from panel, wiring complexity, and outdoor installation add to labor and material costs. |
| Additional Options | Sub-panels or future-proofing upgrades may raise upfront costs but help in the long run. |
| Labor Quality & Materials | Skilled electricians and better materials ensure safety but may cost more. |
You may need to upgrade your electrical system to support a new charger at home. Panel upgrades can cost between $500 and $3,000. If you need new wiring or trenching, expect to pay $10 to $20 per foot. Permit and inspection fees usually range from $50 to $800. The total cost for electrical upgrades often falls between $1,000 and $3,000. Older homes may need more work, which can increase the price. Always ask your electrician to check your panel before starting the project.
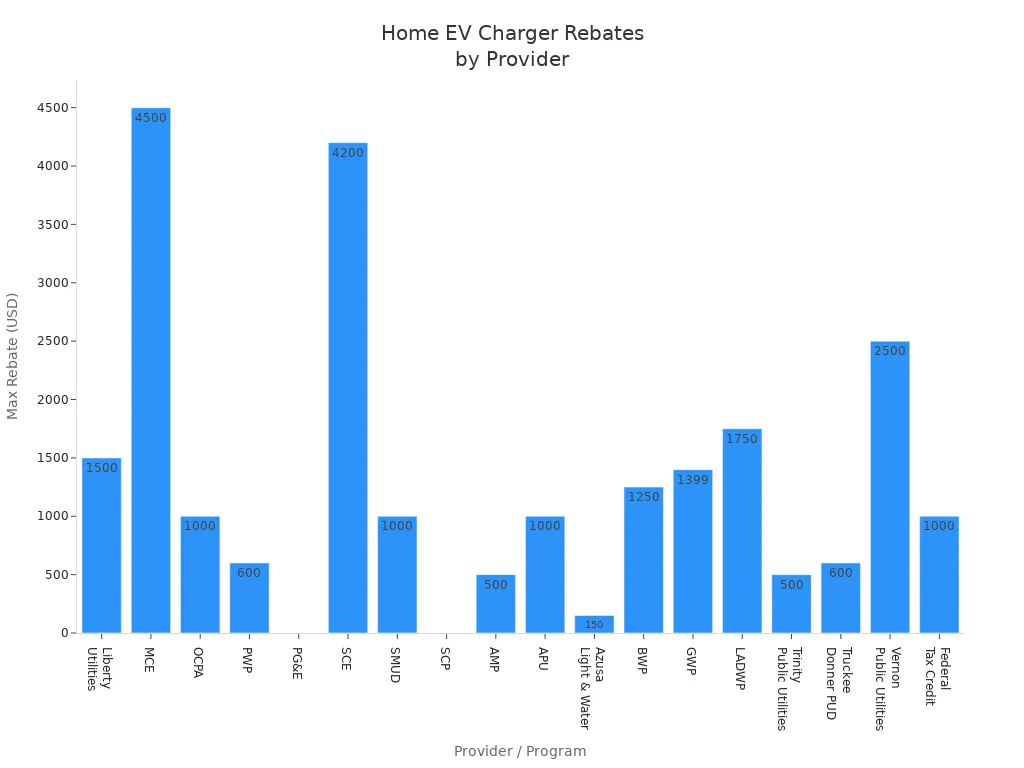
Many utility companies and local governments offer rebates to help lower your costs. Some programs give up to $1,500 for a Level 2 charger at home. Others offer free chargers or extra money for panel upgrades. You can also get a federal tax credit of up to $1,000 for installing a home EV charger. Check the chart below to see how much you could save in your area:
You have several ways to pay for your charger and installation. Many companies offer financing plans with terms from 3 to 60 months. Some plans have 0% APR, so you can pay over time without extra fees. You can also use home equity loans, PACE financing, or special energy loans from banks and credit unions. These options make it easier to manage the cost and start charging your EV at home right away.
You want your EV charger to be safe. Pick a charger with a UL or ETL safety mark. Check for these marks on the charger’s label. These marks show the charger passed safety tests. Do not use chargers without a safety earth ground. Avoid chargers with only a CE mark. Hire a licensed electrician to install your charger. This makes sure the wiring and breaker are correct. Put the charger in a dry, airy place near your main panel. This helps lower wiring risks and keeps things safe. Never use extension cords because they can get too hot and start fires.
Tip: Inspectors look for safety marks before they approve your charger.
Taking care of your charger keeps it safe and working well. Check plugs and cables every week for damage or burns. Clean the charger and cable with a dry cloth to remove dust. Coil the cable after each use to stop it from bending. Watch the charger’s performance with its app or software. Update the firmware when new updates come out. Use weatherproof covers for outdoor chargers. Get a professional inspection once a year. The electrician will check wires, test voltage, and change old parts. Check for damage from heat, cold, or storms each season.
Look for overheating while charging. If plugs are hot, stop and call an expert.
Test GFCI protection often to stop electric shocks.
Follow the maker’s maintenance schedule for your charger.
You can make charging at home safer by following easy rules:
Use a circuit just for your charger.
Do not force the plug into the car port.
Keep the charger and plug dry always.
Unplug the charger when you are not using it.
Store cables neatly so no one trips.
Follow all instructions from the manufacturer.
Learn how to disconnect the charger in emergencies.
Remember: Smart charging lets you charge at off-peak times. This saves money and lowers the electrical load.
Charging at home gives you control and helps you feel safe. With good installation, regular care, and smart habits, you can charge your car every day without worry.
When you put in ev charger equipment, follow some simple steps to make it easy:
Pick Level 1 or Level 2 chargers for what you need.
Hire a licensed electrician to keep things safe and legal.
Make sure your car and electric panel work with the charger.
Get permits and follow your city’s rules.
Use a weatherproof charger if you want to put it outside.
Charging at home is easy and saves you money. It can also make your house worth more. You get steady charging and feel safe every day.
Charging time depends on your charger type. Level 1 chargers add about 4-5 miles per hour. Level 2 chargers add 20-30 miles per hour. Most people charge overnight and wake up to a full battery.
Yes, you need a permit in most areas. Permits help make sure your installation meets safety codes. Always check with your local building office before starting your project.
You can install an EV charger outside. Choose a charger with a weatherproof rating. Mount it at least 24 inches above the ground. Use a cover to protect it from rain and snow.
Charging your EV at home will increase your electric bill. You can save money by charging during off-peak hours. Many smart chargers let you set charging times to lower your costs.
First, check the power supply and cables. Restart the charger using its app or power switch. If the problem continues, contact a licensed electrician or the charger’s support team for help.


